Documentation
Help & guides
Everything from first launch to setting a 4:2 octave by its own partials.
Getting started
Install
Grab Reson8 for your platform from the download page — it detects your operating system and points you at the right store. Or skip installing entirely: Reson8 Web runs free in your browser, with everything except the professional piano and drum suites. Most browsers will also offer to install it to your home screen or dock, so it behaves like an app from then on.
First run
- Allow microphone access when asked. Reson8 listens locally — audio never leaves your device.
- Pick a workflow — guitar, bass, ukulele, piano, wind or drums. Each has its own presets and display. The same list holds the metronome and tone generator; while either of those is selected, the tuner is not listening.
- Play a note. The input meter should move and the strobe should light. If it stays dark, see troubleshooting.
Reading the display
Colour is tuning state
Three colours carry the verdict, and they are never used for anything else: MINT means locked (within 3 cents), AMBER means close but still moving (within 15 cents), and RED means clearly out. If something on screen is glowing, it's live signal — chrome never glows.
The strobe
The rings behave like a mechanical strobe disc: they rotate at a rate equal to your frequency error and stand dead still when you're on pitch. Direction tells you which way you're off — rotation one way means sharp, the other flat — and speed tells you how far. Unlike a needle, a strobe has no smoothing to hide behind: a slow creep you'd never see on a needle is an obvious drift here.
Each ring is locked to a different partial of the note, measured independently. On most instruments they agree; on piano they must not — see the piano guide.
The spectrum
Below the strobe is the spectrum — labelled CONSTANT-Q SPECTRUM on desktop, which just means every octave gets the same number of steps: 24 of them, 160 in all, from 55 Hz to 5.4 kHz. Equal steps on screen are equal musical intervals, so an octave is the same width at the bottom of the display as at the top, and adjacent bass notes stay visibly separate. It is fed before the noise gate, so it keeps showing the room even in silence.
The drift trace
The intonation trace plots your pitch over the last several seconds on a ±25-cent scale. Use it to see what happens after the attack: does the note settle, sag, or ride sharp? For wind players this is the long-tone practice display.
The input meter
Live level with clipping and gate state. If it shows clipping, back off the input or move the mic — a clipped signal distorts the very harmonics Reson8 is measuring.
Guitar
Tunings
Twenty-one presets cover standard, drop, open, modal and 12-string course tunings. Select one and the display shows each string's target; play a string and Reson8 identifies which one you meant.
Strum mode
Strum all six strings at once and every string is measured in the same frame — an independent frequency, cents offset and clarity per string, with no string-by-string picking. Use it as a ten-second health check before a set, then fine-tune any string the readout flags.
Why your low E doesn't read an octave high
An acoustic guitar's body resonates hard around 247 Hz, so a plucked low E can arrive with its fundamental quieter than its own overtones — the classic way cheap tuners read E3 instead of E2. Reson8 tests sub-harmonic candidates and promotes them only when they genuinely correlate better, which keeps low strings anchored without inventing octaves on clean signals.
Bass & ukulele
Bass
Presets cover 4-, 5- and 6-string basses in standard and drop tunings. The analysis window is sized for slow, low fundamentals: the detector reaches from below a 5-string's low B (30.9 Hz) down past A0 (27.5 Hz), so every preset's bottom string is inside the measured band. Give the lowest strings a full second of ring — a 31 Hz string simply takes longer to complete enough cycles to measure than a 330 Hz one.
Ukulele
Reson8 is reentrant-aware: high-G standard, low G, baritone, D tuning and slack-key presets list strings as strung — string 4 first — not sorted by pitch. On a high-G uke, string 4 really is higher than string 3, and the display respects that.
Piano
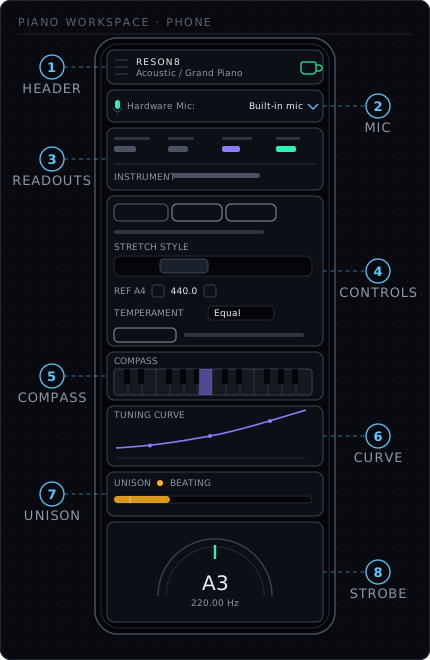
Piano mode is a full tuning instrument: it measures your piano's inharmonicity per key, solves a tuning curve from those measurements, and gives you a per-partial strobe, unison beat rates, temperaments and pitch-raise over-pull. Everything autosaves to a per-instrument record.
If you've never tuned with an app before
The eight numbered parts further down explain what Reson8 is doing and why. This part answers the other question — which control, in what order, and what the screen should look like when it has worked. It assumes you can find a key by name and that you have a tuning lever and a mute strip or a pair of rubber wedges. It does not assume you have ever used a tuning app. Everything below works in the free tier — measure, solve and tune C3 to C5 — on every platform including the web; the full compass, the library and the pro panels are the Piano Pro purchase.
Your first piano session, step by step
-
Quiet the room and place the device. Shut windows and
switch off anything with a fan. Stand the phone or tablet on the music
desk of an upright, or on the desk or rim of a grand with the lid up —
roughly a foot from the strings you are working, screen toward you.
Then turn on keep awake: the coffee-cup icon in the
top bar, which glows green when it is on. A screen that sleeps every
thirty seconds is the single most annoying thing about tuning with a
phone, and it is one tap to fix.
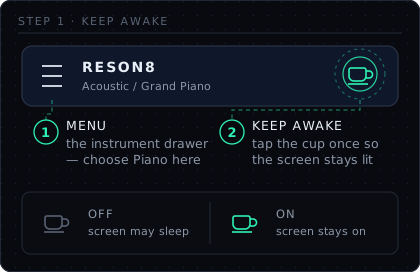
Step 1 — the header. Menu on the left, keep-awake cup on the right; mint means the screen will not sleep. -
Choose the input, if there is a choice. The
microphone picker — labelled Hardware Mic above the workspace
on a phone, a mic-icon chip in the header on desktop — lists the
inputs the system is offering. A built-in mic is fine; what matters is
that the
one selected is the one pointed at the piano — a laptop with a headset
plugged in will otherwise listen through the headset.
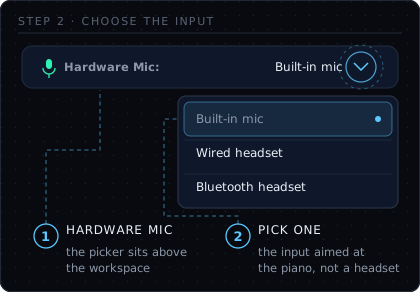
Step 2 — the input picker, open. The inputs are named by role; pick the one pointing at the piano. - Select Piano from the instrument list — the drawer behind the menu button on a phone, the rail on desktop. Play any key and check that the strobe lights and the input meter moves before you pick up the lever.
-
Start a record in the library. Press
LIBRARY, type a name you will recognise in a year
("Steinway B — Smith residence"), and press NEW PIANO.
The INSTRUMENT line under the readouts should now show
that name and 0 of 88 keys measured. If it instead reads
none open — this pass is not being saved, nothing you measure
is being kept. Make and model, serial, customer and location can be
filled in at the bottom of the same dialog; the serial is what finds
the right record next time.
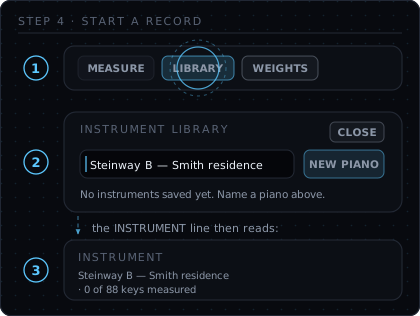
Step 4 — LIBRARY, name, NEW PIANO. The INSTRUMENT line is the receipt: check it before you measure anything. - Set REF A4. The ± steppers move it in half-hertz steps between 392 and 466 Hz. Leave it at 440.0 unless the instrument lives with an orchestra that has told you otherwise. Leave TEMPERAMENT on Equal for a first tuning — the historical temperaments are a deliberate musical choice, not an improvement.
-
Pick a stretch style. Choose
Balanced and leave WEIGHTS alone. It
is the middle of the four, it suits nearly every instrument in a room
rather than on a stage, and every style is only a starting set of
weights the solver will shape with your measurements anyway. Clean,
Expanded and Pure 12ths are opinions to form later, on a piano you know.
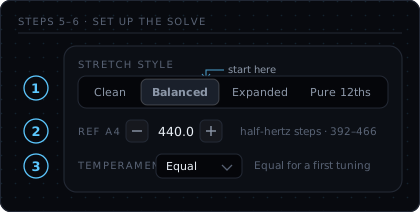
Steps 5–6 — what the solver is aiming at. Balanced, 440.0, Equal is the first-tuning setting on nearly every instrument. -
Put the mute strip in and measure about a dozen keys.
The measurement wants one string at a time: an unmuted unison splits
every partial into close-spaced components and the fit has to guess
which one it is looking at. For each key:
- Tap the key on the COMPASS keyboard. The legend above it changes from select a key — this arms MEASURE to PINNED — select again to follow, the key gets an ice outline, and the greyed-out button becomes MEASURE A3.
- Press MEASURE, then strike the key once, firmly, and hold it down. No pedal — the pedal lifts every damper in the piano into your measurement.
- The status line counts fits as they land: 1/5, 2/5 … with the partial count and the fit residual beside each. At five it takes their median and reports Measured A3 B = 3.14e-4 · 9 partials. The key turns violet on the compass with a dot under it, and the record saves itself immediately.
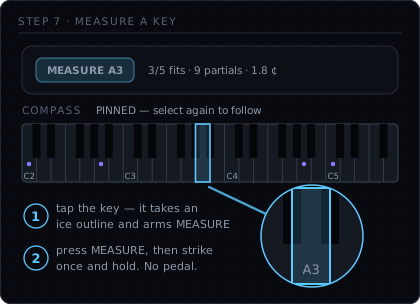
Step 7 — one key at a time. Pin it, press MEASURE, strike once and hold until the count reaches 5/5. -
Know what a failed measurement looks like. It never
invents a number; it says which way it failed.
- Hold the note — only 2 clean partials, needs 3: it has not heard enough yet. Strike harder and hold longer.
- Hold the note — 6 partials found, but they fit to 5.2 ¢ (needs under 3). Usually a second string still ringing: check your mutes.
- Measured A4, not A3 — check which key is pinned: you struck a different key from the one selected.
- The top octave has too little partial energy to measure: expected, not your fault. Above roughly C7 a string is so short it is nearly a pure tone, and the three partials a fit needs are not in the room. The curve extrapolates from the highest key you did measure.
- Read the curve. The panel legend flips from GENERIC RAILSBACK CURVE — published average, measure this piano to COMPUTED TUNING CURVE — solved from 12 measured keys in violet. That is the moment the app stops working to a textbook average and starts working to your instrument. Measured keys are marked along the curve; the marker for the key you are playing sits on the curve when the key is right.
-
Now tune. Take the mute strip back to the centre
string of each unison and work key by key, starting where you like —
most technicians set the temperament octave around A4 first, then work
outward. For each key: select it on the compass, strike it, and watch
ERROR and the strobe. Negative ERROR means the string
is flat of target, so the pin needs tightening; positive means it is
sharp, in which case go below the target and come back up to it. As
you approach, the strobe rings slow and stop — a ring that stands
still is that partial in tune — and ERROR turns
MINT inside 3 cents.
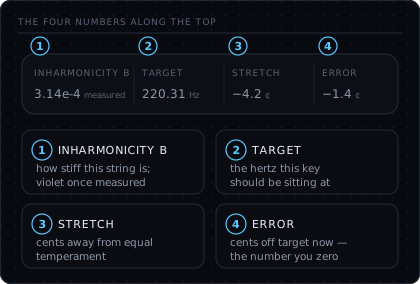
The four numbers along the top. ERROR is the one you work to zero; the other three say what it is being measured against. -
Set the unisons. With the centre string on target,
release one of its neighbours and tune that string to it. Strike the
pair once and let it ring: the UNISON meter
reads beats per second, not cents, and a beat cannot be observed
faster than it beats.
- LISTENING, with 1.4 s of ring — hold the note: it is still gathering evidence. Restriking restarts the clock, so do not help it.
- BEATING with a number, and CLOSING or WIDENING beside it: that is the direction answer. A beat rate has no sign, so the honest statement is not "the string is flat" but "keep turning and the rate is falling". If it says WIDENING, you are going the wrong way.
- CLEAN: done. The marked line on the bar is the half-a-beat working tolerance.
- UNSTEADY — level moving, but no steady beat: something is sounding but there is no periodic beat behind it. Usually room noise or a false beat in the string itself.
- no key selected: nothing is armed. Select a key on the compass.
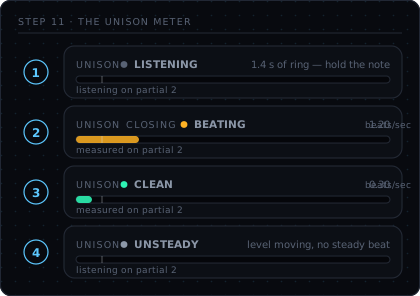
Step 11 — the unison meter reads beats per second, not cents. CLOSING means keep turning; the tick on the bar is half a beat. -
If the piano is far flat, use PITCH RAISE first. A
whole piano coming up in tension flexes the frame, so strings tuned
early go flat again as the rest come up. Turn
PITCH RAISE on, play keys across the compass and press
SAMPLE on each one while it is ringing cleanly — the
status names each one, e.g. A3 is 34 ¢ flat · 5 sampled — and
the OVERPULL readout shows how far above the final
target the app is now aiming. Tune the whole piano to those raised
targets, then turn the mode off (or press RESET) and
tune it again properly. Two rough passes beat one hopeful one.
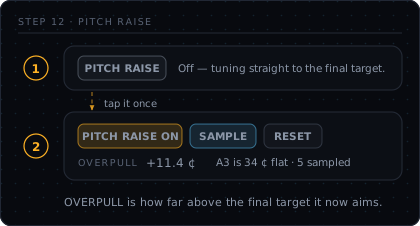
Step 12 — pitch raise. SAMPLE keys across the compass and OVERPULL shows how far above the final target it is now aiming. - Nothing needs saving. Measurements, stretch style, weight edits, reference pitch and temperament all write themselves to the open record as they happen. Next visit, open the record from LIBRARY and the measured compass comes back — which is what turns a return visit into a tuning rather than a measurement session. Pitch-raise samples are the exception: they belong to the pass, not the instrument, and do not persist.
What the numbers along the top mean
| Readout | What it is telling you |
|---|---|
| INHARMONICITY B | The stiffness coefficient in use for the active key. Marked measured in violet when it came from this key's own measurement, interpolated when it was inferred from measured keys either side, and not measured — a dash — before anything has been measured at all. |
| TARGET | The frequency in hertz the active key should be at: the solved curve, your reference A4 and the temperament folded together. A dash when no key is armed. |
| STRETCH | How far that target sits from equal temperament, in cents — negative in the bass, positive in the treble. Violet once the curve is solved from your own measurements, grey while it is still the generic average. |
| ERROR | How far the string is from the target right now, in cents. Negative is flat, positive is sharp. Mint inside 3 cents, amber to 15, red beyond — the same colours the strobe uses. This is the number you are working to zero. |
1 · Measure the piano
Stiff strings run their partials sharp of exact harmonics by a factor B that varies by two orders of magnitude across one instrument — no lookup table can know your piano. Play single, clean notes across the compass and Reson8 fits B for each measured key. Around a dozen keys spread over the range is enough to anchor the model; a measurement that can't produce a clean partial series reports failure rather than a plausible-looking number.
2 · The solved curve
Every interval a tuning tries to make beatless contributes one constraint, and on a real piano they contradict each other — that's the whole reason tuning is a craft. Reson8 solves the weighted least-squares compromise across all 88 keys, with A4 on the fork. Octaves, twelfths, double octaves and nineteenths participate; fifths deliberately don't, because the comma they'd distribute belongs to the temperament, not the stretch.
3 · Stretch styles and interval weights
Four stretch styles are supplied — they're weight sets over the interval table, leaning on wider or narrower octave types. The WEIGHTS dialog exposes the seven underlying sliders directly, so you can bias, say, 4:2 octaves over 2:1 in the treble. Weights are relative — only their balance matters — and re-selecting a style resets them, so a preset always arrives clean. Custom weights are saved with the instrument's record.
4 · Tune with the per-partial strobe
Each strobe ring locks to its own partial. This matters on piano: stiffness pushes partial n sharp of n× the fundamental, so when a key's fundamental is exactly on target, its upper partials are correctly off their rings — the rings refusing to agree is the instrument being honest. Setting a 4:2 octave means working partial 4 of the lower key against partial 2 of the upper — watch those two rings, not the fundamental.
5 · Unisons
A spectrum can't resolve two strings half a beat apart — but your ear doesn't either; it hears the beat. Reson8 does the same: it follows one partial, times the swelling and fading in it, and reports beats per second. Two things to know:
- Verdicts take a few seconds by construction. A quarter-beat-per-second unison needs four seconds to complete one cycle — the display says "listening" until it has the evidence.
- Restriking restarts the clock. The detector rejects the rhythm of repeated strikes as a false beat, so strike once and let it ring.
6 · Temperaments
Equal temperament plus seven historical temperaments — Werckmeister III, 1/4-comma meantone, Pythagorean and more — each derived from its circle-of-fifths rule and anchored so A stays on the fork whichever you select. Temperament rides on top of the stretch as a separate layer.
7 · Pitch raise
Raising overall tension flexes the frame, so strings tuned early go flat as the rest come up. Pitch-raise mode overshoots each note based on the neighbourhood's average deficiency — it's aggregate tension that moves the structure — and the strobe guides you to the overshoot target directly. Over-pull is capped at 35 cents; a piano far flatter than that wants two passes, and the cap is there to protect its strings.
8 · Records
Every measurement, style choice, weight edit and reference change autosaves to a record for that instrument. Open the record at the next appointment and the curve is exactly as you left it — a reopened record is put through exactly the same calculation a live measurement is, so nothing is approximated from a summary.
| Range note | Detail |
|---|---|
| A0 – F♯7 | Tracks reliably across the compass, including mid-pitch-raise flat pianos |
| A7, C8 | The top two-and-a-half keys are beyond the pitch tracker; use the spectrum and your ear |
Brass & woodwinds
Transposing readout
Select your instrument's key — B♭, E♭ or F — and the display shows the note you finger, not the concert pitch that sounds. Play a written C on a B♭ trumpet and the screen says C, judged against the sounding B♭.
Long tones
The drift trace is built for long-tone work: hold a note and watch the line, not the needle. A tone that starts centred and sags 10 cents as you run out of air is invisible on an instantaneous readout and obvious on the trace. The ±25-cent scale is deliberately tight — at that zoom, embouchure habits have nowhere to hide.
Drums
Tuning a drum for the first time
A drum does not have a correct pitch the way a string does. There is no note a 12-inch rack tom is supposed to be at, and no app can tell you one. What a tuner gives you is the two things that are objective: whether every lug is pulling the head evenly, and what pitch the head actually ended up at — so that when a drum finally sounds right, you can write the number down and get back to it after the next head change. The drum tools are free on every platform, the web included.
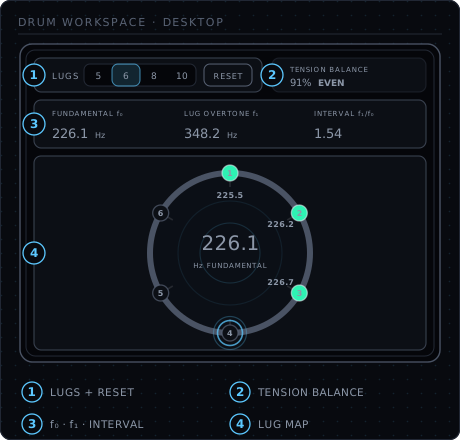
The part worth knowing before you start: Reson8 does the bookkeeping. You strike beside one lug, it hears the hit, writes that lug's pitch onto the map and moves on to the next by itself. You are not selecting anything between taps — you are just going round the drum. When you want to stop going round and work one rod up to pitch instead, you can lock its node and every strike lands there.
- Get the drum off the stand and work one head at a time. Rest it on a carpet, a towel or a cushion so the head you are not working is damped — otherwise it answers back into every tap and you are measuring two heads at once. If you are fitting new heads, do the resonant (bottom) head first and the batter second, so the head you finish on is the one you play.
- Seat the head before you measure anything. Finger- tighten every tension rod until it just bites and the wrinkles are gone, then press the heel of your hand firmly into the centre to seat the head on the bearing edge — it will crackle — and finger-tighten again. Measuring a head that has not been seated means measuring it twice, because it will settle under you. If the drum is badly out, slacken every rod off and start from finger-tight rather than trying to rescue it.
-
Set LUGS to the number of tension rods on the drum —
5, 6, 8 or 10. It decides how many nodes the map draws, so the picture
on screen matches the drum in front of you. Changing it clears every
reading, because lug 4 on a six-lug drum is not lug 4 on a ten-lug
one; set it before you start. RESET, beside it,
throws the map away and puts you back on lug 1.
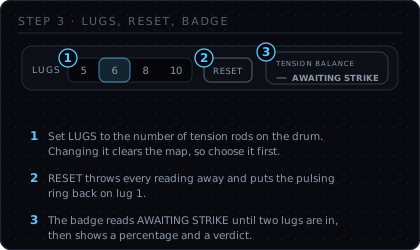
Step 3 — LUGS, RESET and the badge. Before the first strike the badge reads AWAITING STRIKE. -
Tap about two inches (5 cm) in from the hoop, directly in
front of lug 1. Lug 1 sits at the top of the map and the
numbering runs clockwise, and the node wearing the pulsing ice ring is
the one your next strike will be filed under. Use the same object and
the same weight every time — a stick tip or a fingertip, a light tap,
not a hit. Rest a finger lightly in the centre of the head while you
tap: that damps the head's own boom and leaves the edge mode the lug
actually controls. Kill anything sympathetic first — snares off, other
drums muted.
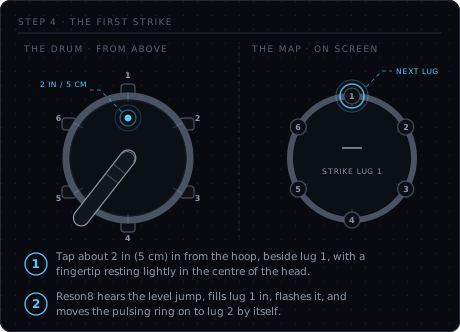
Step 4 — where to tap, and what the map looks like waiting for it. - Let the app file the strike, and wait for the ring to move. Reson8 hears a hit as a sudden jump in level, not as a pitch appearing, so a still-ringing head cannot re-trigger it. It then listens for about a third of a second, takes the median pitch of that window, writes it to the pulsing lug, throws a confirmation flash off the node and steps the ring on to the next lug. Nothing to press. If the node did not fill in and the ring did not move, the tap was too soft or too muffled — hit it again.
-
Go round the hoop until every node is filled. Each
measured node takes a colour and carries its own pitch in hertz
inboard of it, so the map is the tension map — no writing
anything down. Green means that lug is within 10 ¢ of the head's
average, amber within 30 ¢, red beyond it; unread lugs stay dim
outlines. When the last one lands, the centre reads
ALL 6 LUGS READ · SPREAD 50 ¢. Lugs reading low are slack,
lugs reading high are tight.
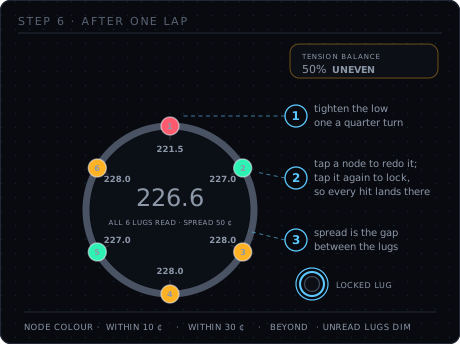
Step 6 — one lap done. One lug well low, the rest bunched at the top: 50 ¢ of spread, and the badge says UNEVEN. - Read TENSION BALANCE as a verdict, not a score. It is the spread across the lugs you have read, expressed as a percentage: 20 ¢ or less is EVEN (80% and up), 60 ¢ or less is UNEVEN (40% and up), and anything wider is OUT OF BALANCE. Below two lugs there is nothing to compare, so it shows AWAITING STRIKE or how many lugs are in so far. The bands are real-world: a five-lug rack tom reading 222–229 Hz round the hoop is 50 ¢ of spread — UNEVEN — and it sounds "close" by ear, which is exactly what the middle band is for.
- Compare the numbers; do not worship them. A head has a fundamental and a lug tone about an octave above it, and which one the detector locks onto depends on the strike, so a raw lap can read 110 Hz at two lugs and 221 at three on a head that is nearly even. Reson8 folds every reading into the octave of the lugs already measured — the first lug you read sets the octave — so the map always compares like with like. If that first reading looked wrong, press RESET and start the lap again rather than trying to reason about the numbers.
- Adjust in quarter turns, in a star pattern. Never a full turn, and never round the drum in a circle: tighten one rod, then the one opposite it, then the next pair, the way wheel nuts go on. Bring the outliers toward the group rather than moving every lug — if one lug reads low, raise that one, and leave the ones that already agree alone. Then tap round the drum again; a second lap simply overwrites the first. On the rack tom above, a few laps of quarter turns on the low lugs brought all five inside 9 ¢ — EVEN. If the readings refuse to converge, the head is not seated, the bearing edge is dirty, or the head is finished.
- To work one rod up to pitch, lock its node. Chasing a single stubborn lug through the round-robin means it hands the ring on after every hit. Instead, tap that node to aim the next strike at it, and tap it again to lock it: the ring goes solid and doubles up, the centre reads LUG 3 LOCKED · TAP AGAIN TO RELEASE, and every strike from then on updates that one lug while nothing advances. Turn, tap, watch the number, turn again. Tapping it a third time, tapping a different node, or pressing RESET releases the lock and the lap resumes from wherever the ring is.
- Now choose the pitch. With the head even, take the whole head up or down a little at a time — same quarter turns, same star pattern — until it sits where you want it, and check the balance again after each round. Every head has a band where the drum speaks: too slack and it flaps and chokes, too tight and it strangles. f₀ is the number to write in your case lid. The panel above the map reads it live while the head rings, beside LUG OVERTONE f₁ — a second ringing mode of the head that Reson8 actually goes looking for, which shows — when that strike had none to find — and INTERVAL f₁/f₀, the ratio between them.
- Then do the other head, and pick the relationship. Both heads at the same pitch gives the longest, most even sustain and the clearest sense of a note. A resonant head tighter than the batter gives the note a downward bend after the attack; slacker gives it an upward one. None of these is correct — they are the standard starting points, and the reason to measure is so the one you like is repeatable. Once the drum is back on its stand, tap it again: mounting hardware and a snare bed both change what you just tuned.
Lug map
Clearing a head means equal tension at every lug, so the map measures exactly that: each strike is captured, attributed to one lug, and kept as that lug's own pitch. Lug 1 is at the top and the numbering runs clockwise, the node awaiting the next strike pulses, and each measured node carries its hertz reading inboard of it. Evenness is then simply the spread of those pitches — the gap in cents between the highest and lowest lug — which is what the TENSION BALANCE badge reports. Nothing here is inferred from a single strike: one clean hit tells you how well the head is speaking, and nothing at all about how evenly it is pulled.
The round-robin suits a lap round the hoop. When you want to stay on one rod, tap its node to select it and tap it again to lock it: the ring goes solid, the centre says which lug is held, and every strike updates that lug until you release it.
Fundamental and overtone
f₀ is what the head actually rang at on the strike you just made — the number the map is built from, and the one worth writing in your case lid. f₁ is a second membrane mode, found by searching the spectrum between about 1.3× and 2.1× f₀ for a peak strong enough to be real; it is measured rather than assumed, so a strike with no clear second mode reads — rather than inventing one. INTERVAL f₁/f₀ is the ratio between them, a description of how that head is speaking. Batter and resonant heads are tuned the same way; their relationship sets the shell's sustain and pitch bend.
Metronome
The metronome sits in the same list your instrument does. Selecting it stops the tuner: a metronome is not a thing you tune, and while it is open nothing is listening — the microphone is released.
Tempo
30 to 300 BPM, set with the ± controls or by tapping. Tap tempo averages the intervals between your last five taps, so one uneven tap nudges the tempo instead of throwing it, while a deliberate speed-up is still followed. The first tap of an attempt only marks the downbeat — there is no interval to measure yet — and leaving a gap of more than about two and a half seconds starts a fresh attempt.
Bars and subdivisions
Bars run from 1 to 16 beats. The downbeat is accented and the beat dots show where in the bar you are; a bar of one gives an unaccented pulse. Subdivision fills the beat with eighths, triplets or sixteenths, sounded at a little under half the beat's level so the beat itself stays the thing you hear.
Why it doesn't drift
Clicks aren't fired from a UI timer, which would inherit every hitch in the interface. The scheduler runs ahead of what you're hearing and books each click onto the audio device's own clock, so the beat is as steady as the device is. Tempo changes are read fresh on each click rather than cached, so a new BPM takes effect on the next click, not the next bar — and the beat readout follows the audio clock, not the scheduler, so the dots flash when the click sounds rather than a fraction of a beat early.
Tone generator
A steady reference tone for tuning by ear, pitching a section, checking an instrument against a fixed pitch, or ear training. Like the metronome, it stops the tuner while it's open — and here that is not just battery: a tuner listening to a tone this app is generating would be measuring itself.
Setting the pitch
The range is A0 (27.5 Hz) to C8 (4186 Hz) — the piano compass. Step by semitone, or dial an exact frequency. Whatever you set, the readout names the nearest note and how many cents you are from it, so an arbitrary frequency stays legible as music. The naming follows the tuner's own reference pitch, which is shown underneath — set A4 to 415 and the same tone is named against that, because a note name means nothing without the standard behind it. What the reference does not do is re-pitch a tone you have already set: dial 440.0 and you keep 440.0, with the readout telling you where that now sits.
Waveform
Sine, triangle, square or sawtooth. A sine is the purest reference but the hardest to tune against — there is only one partial to beat with. The richer waves give your ear beats at several partials at once, which is why a reed or a drone is easier to match than a test tone.
Settings
| Setting | What it does |
|---|---|
| Reference pitch | Sets A4. Default 440 Hz; orchestras and historical instruments commonly want 441–443 or lower. Every target in every workflow follows it, as does the tone generator's note readout. |
| Noise gate sensitivity | Strict to permissive. Strict ignores more of the room but needs a cleaner signal; permissive tracks quieter playing at the cost of occasionally chasing noise. The spectrum ignores the gate entirely. |
| Transposition | B♭ / E♭ / F / concert, in the wind workflow. |
| Output device | Where the metronome and tone generator play. Desktop and mobile only; it replaces the input picker while a tool is open, and remembers what actually opened rather than what was asked for. |
| Piano: stretch style | Four presets over the interval-weight table; selecting one clears custom weights. |
| Piano: interval weights | The seven solver weights, editable per instrument via the WEIGHTS dialog. |
Troubleshooting
The display stays dark when I play
- Check the OS microphone permission for Reson8 — on macOS and mobile it's asked once, and a denial is remembered.
- Check the input meter. If it doesn't move at all, the OS is handing Reson8 the wrong input device — pick the right one in your system sound settings.
- If the meter moves but the tuner doesn't wake, the noise gate may be set too strict for a quiet instrument. Ease the sensitivity toward permissive.
The reading jumps around
- A clipped input distorts harmonics — if the meter shows clipping, back away from the mic.
- Other pitched sound in the room (a TV, another instrument) competes for the tracker. The spectrum will show you exactly what else is sounding.
- On guitar, old strings with dead windings produce genuinely unstable pitch — the tuner is reporting it, not causing it.
It disagrees with my other tuner
On piano, and on the low strings of anything acoustic, that's expected — and Reson8 is the one with the evidence. Inharmonicity puts a real instrument's partials sharp of the textbook values, so a tuner that listens to an overtone and assumes it's a perfect multiple reads differently from one that measures the partial as it actually is. The spectrum shows you the partials; you can check both claims against it.
Unisons say "listening" for a long time
That's the physics: a beat can't be observed faster than it beats. A very slow beat takes several seconds to complete a cycle, and striking the key again restarts the observation. Strike once, let it ring, wait for the number.
The very top of the piano won't lock
A7 and C8 are beyond the pitch tracker's band. Tune them by octave against the ear or the spectrum — which is what most technicians do up there anyway, fundamental energy being as scarce as it is.
The metronome or tone generator won't sound
- If a notice says the audio device refused to open, the output failed, not the tool. Pick a different device from the chip at the top of the screen — the system default is sometimes the one output that won't open.
- Check the tool's own volume control as well as the system's; they're separate.
- On desktop, another program holding the device exclusively will block it. Close it, or choose a different output.
The tuner went deaf after I used a tool
It shouldn't — leaving a tool releases the output device before asking for the microphone back, which is the ordering iOS requires when playback and capture share one audio session. If the display stays dark after returning to an instrument, switch workflows once to force the request again, and report it if that's what it took.
The web version won't hear anything
- Browsers require a click before a page may open the microphone — if the banner says it's waiting, tap or click once anywhere in the app.
- If you previously denied the microphone, the browser remembers: look for the microphone icon in the address bar and re-allow it, then reload.
- The app itself turns off the browser's voice-call processing (echo cancellation, noise suppression, automatic gain) — those settings eat decaying strings. If readings still look wrong, check that no browser extension is intercepting audio.
FAQ
Is there a free version?
Yes — Reson8 Web runs free in your browser, no account and no time limit. Nothing to install, and your audio never leaves the tab. It covers guitar, bass, ukulele, brass, woodwinds and drums in full — strobe, spectrum, strum mode, drift trace, lug map, all of it — plus the piano workflow in evaluation mode. Our gift to the music community.
What's different in the web version?
Nothing, deliberately. The web version is the same tuner with the same free tier as every other platform: guitar, bass, ukulele, winds, drums, the metronome and tone generator, and the piano workflow in evaluation mode — measure, solve and tune C3 to C5, with nothing saved. The full 88-key range, the instrument library and the pro panels are the Piano Pro purchase, which is sold in the iOS, Android and Windows apps. No nag screens, no degraded readings.
Are the metronome and tone generator free?
Yes, on every platform including the web — they are not part of the paid piano suite. Both live in the same list your instrument does, and selecting either one stops the tuner: the microphone is released, so the recording indicator goes out and no battery is spent analysing audio nobody is watching.
Can I run the metronome while tuning?
No, and deliberately. The tools play and the tuner listens, and a tuner measuring a tone this app is generating would be measuring itself. Keeping them mutually exclusive is the honest arrangement — and on iOS it's also what stops playback and capture fighting over one audio session.
Does audio leave my device?
No. Everything is analysed on your device as you play — in the web version, inside the browser tab. Nothing is recorded to a file, nothing is uploaded, and there are no accounts. Reson8 works with no network connection at all, and piano records are files on your device.
How accurate is it, really?
On a 440 Hz reference tone the measured error is ±0.003 cents. On real room recordings of an acoustic guitar, frame-to-frame spread on a plucked low string is under half a hertz — which is why the strobe sits still instead of shimmering. Those numbers come from an automated test suite that re-checks them against both synthetic tones and real recordings on every build.
Do I need a special microphone?
No. Built-in laptop and phone mics are fine for tuning: pitch lives in timing, not fidelity. For piano inharmonicity measurement, quieter rooms and closer placement help the partial fits.
Is my old tuner's "±1 cent" the same as your cents?
A cent is a cent — 1/100 of a semitone. The difference between tuners is what they measure it against: Reson8 measures each partial as it actually sounds on your instrument rather than assuming textbook harmonics.
Which platforms are supported?
Windows, macOS, Linux, iOS and Android — the same tuner everywhere, plus the free web version. See the download page for stores and system requirements.
Under the hood, for the curious
All the measurement is one self-contained C++ library with no outside dependencies, shipped inside the app on every platform and compiled to WebAssembly for the browser — which is why the numbers are identical everywhere and why nothing needs a server. It never opens a network connection, never writes your audio to a file, and there is no account system to attach it to if it did.
I found a bug. Where does it go?
Use the feedback option on your store's listing page. A recording of the sound that confused it is the single most useful thing you can include in a report.